Building an AR-15
So you want an AR-15? Whether you build it from scratch, buy it outright, or some combo of the two, this guide will help you understand the parts involved and how they interact. By the end of this article, you should have a basic understanding of all the components shown in the picture below, and hopefully feel confident enough to build your own.
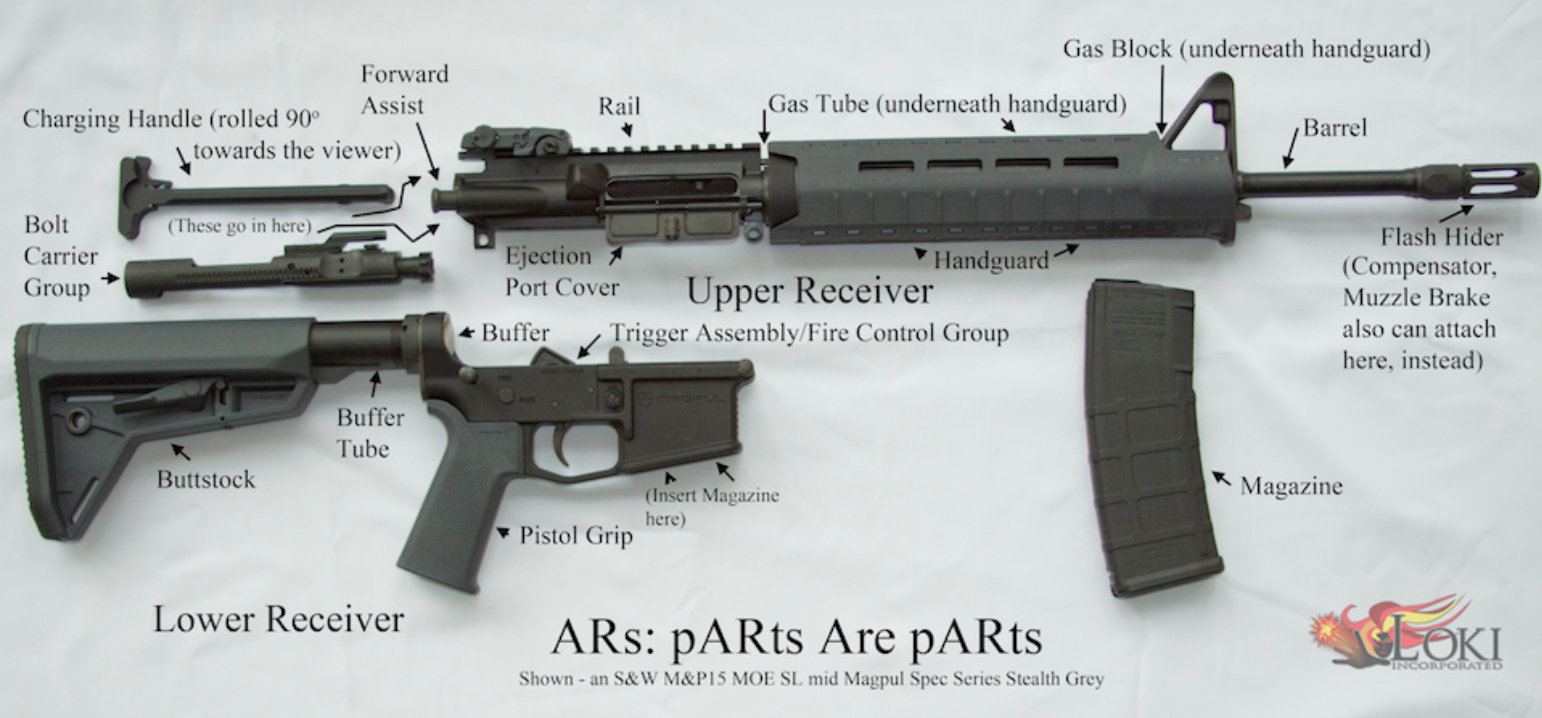
The AR-15, Use as a reference as you read the article 1
History:
Contrary to what some believe, AR does not stand for Assault Rifle. Rather, it is named for its original manufacturer, ArmaLite, giving us the term: ArmaLite Rifle. Eugene Stoner invented the AR-10 (the 7.62 father of the AR-15) in the 1950's as a replacement for the US Army's standard service rifle of the time. It was beaten out by the M14 until some time into Vietnam, when the Army realized it needed a better weapon to compete with the AK-47 of the Vietnamese. ArmaLite had modified the AR-10 to the AR-15 by scaling down the caliber to 5.56x45 in the past but were unsuccessful in marketing it to the public, so they sold the design to Colt. Colt put the AR-15 design up for review by the Army as its new rifle, where it was adopted and designated as the M16. The M16's adoption helped sell the AR-15 to civilians and law enforcement stateside. After 1970, the patent on the Colt owned design expired, leading to the various manufacturers we see today.
Where to start?
The AR-15 is referred to by many as "grown-up Legos". The vast number of manufacturers, various accessories, components, calibers, and color palettes means that the AR-15 is one of the most customizable rifles on the market. So, how do you know what to get when faced with this sea of available parts and pieces? The most important question you can ask about your rifle is: what is its purpose? Target practice, hunting, maybe self-defense? Will weight be an issue? Will you be short range, long range, or maybe a mix of both? Allow the rifle's purpose to be your guide as you decide what parts you need for your build.
Tools:
No matter what route you are going to take, you are going to need the right tools. These include pin punches, vice blocks, and specialized wrenches to make sure you don’t damage or deform the rifle during its construction. While it is possible to buy these tools separately, we recommend this kit from Brownells, as it has everything you will need to get to work. And though the price may seem a little steep, trust us that everything included will be put to use and make the process a hell of a lot easier. Also, be sure to have a solid vice to hold it all steady.
No matter what route you are going to take, you are going to need the right tools. These include pin punches, vice blocks, and specialized wrenches to make sure you don’t damage or deform the rifle during its construction. While it is possible to buy these tools separately, we recommend this kit from Brownells, as it has everything you will need to get to work. And though the price may seem a little steep, trust us that everything included will be put to use and make the process a hell of a lot easier. Also, be sure to have a solid vice to hold it all steady.
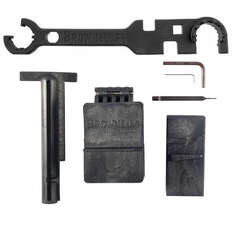
BROWNELLS - AR-15/M16 CRITICAL TOOLS KIT
$139.99
 Stripped Lower Receiver 2
Lower Receiver:
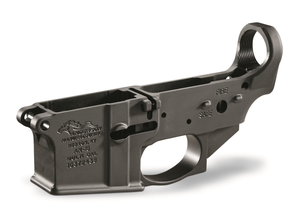
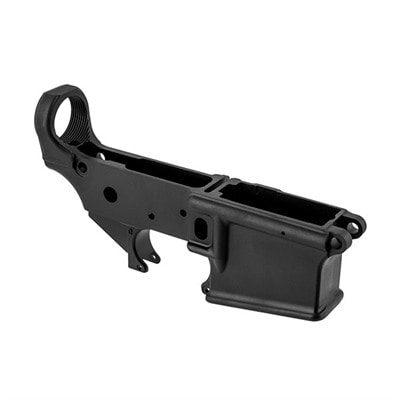
Out of all the parts that comprise a gun, there is only one that is actually legally registered: the lower receiver. It is the housing for the trigger group, grip, buffer tube, and buttstock. While there are many choices, they are all relatively similar. The lower receiver is most often composed of aluminum, but will vary in weight depending on what material is used, although the difference is usually only a matter of ounces. The main differences between them comes down to cosmetics, and of course price. While a cool looking skeletonized lower receiver with a skull carved onto the magwell may look badass, it will often times perform the same as a stock lower. We’ve compiled a few here so you can see how the price varies between them all. Keep in mind that they may all perform pretty much the same, but the adage, “you get what you pay for,” often still rings true as far as fit and finish goes.
Note: of the three below, we recommend the Aero Precision lower, as it has an integrated trigger guard as well as threaded pins. There are parts on the lower that need to have a pin hammered into them to hold the components in place. But, with the threaded pins, it eliminates the potential of hammering the pin incorrectly and messing up your build. All are functional, though, and you cannot go wrong with any of them.
ANDERSON MANUFACTURING - AR-15 STRIPPED LOWER RECEIVER
$58.99 |
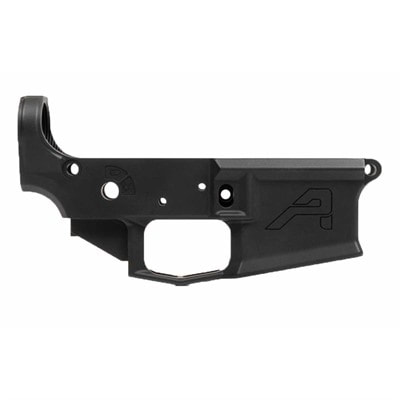
AERO PRECISION - AR-15 M4E1 STRIPPED LOWER RECEIVER
$89.99 |
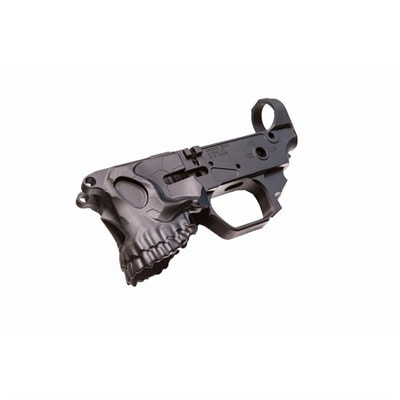
SHARPS BROS - AR-15 GEN 2 THE JACK LOWER RECEIVER
$295.99 |
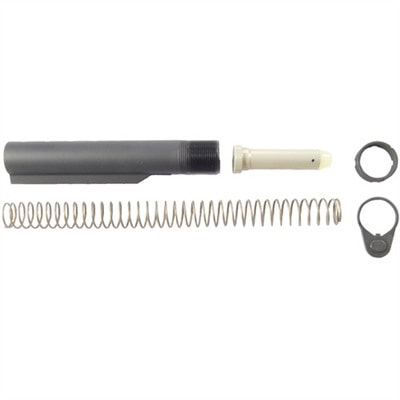
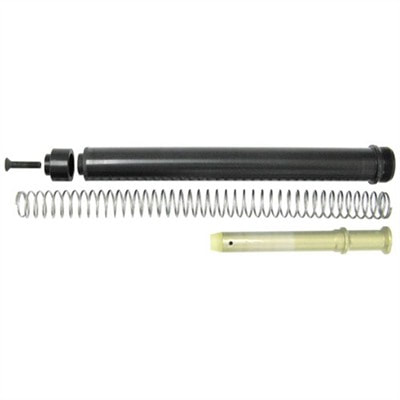
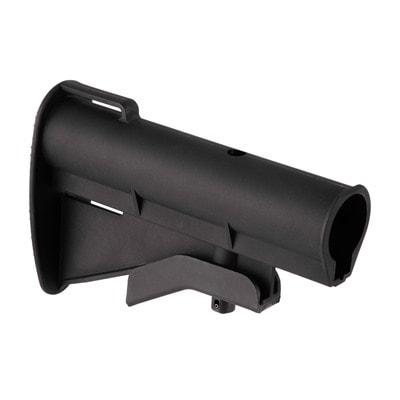
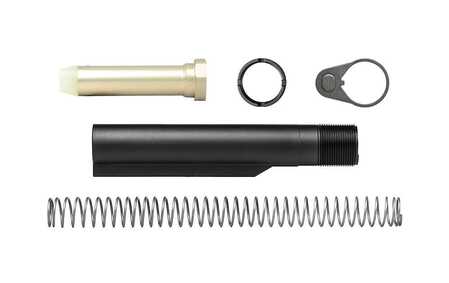 Top, Left to Right: Buffer, Castle Nut, End Plate; Middle: Buffer Tube; Bottom: Buffer Spring 3
Buffer Tube, Buffer Spring, and Buffer:
After firing, the bolt carrier group of the AR-15 is thrown backward in order to cycle a new round, then pushed forward again by a spring and weighted buffer so that it can (1) lock in the barrel, (2) fire a new round, and (3) repeat the process. That spring and buffer is housed within the buffer tube.
There are two different shaped buffer tubes: based on whether they fit a fixed buttstock (one that doesn't move) or an adjustable (also known as a collapsable) one. The adjustable buttstock's buffer tube will be a cylinder with a rectangular piece jutting out, as can be seen in the picture to the right. The fixed buttstock's buffer tube will just be a cylinder with no rectangular part jutting out.
There are two sizes of buffer tubes as well: mil-spec and commercial. The mil-spec is 2/100ths of an inch smaller than its commercial counter part - and that difference may sound small, but it’s the difference between the butt stock you bought fitting well or becoming a fancy paperweight. [The buttstock slides over the buffer tube and allows you to shoulder the rifle.] Be aware that because the mil-spec tube is smaller, a commercial butt stock will fit on it; however, it will be loose and rattle, and will generally not be a good fit. And, because the mil-spec stock is smaller in diameter, it will not fit a commercial buffer tube. This difference only applies to the butt stock area, as all tubes will have the same diameter on the threaded end, allowing any tube to fit into any lower receiver.
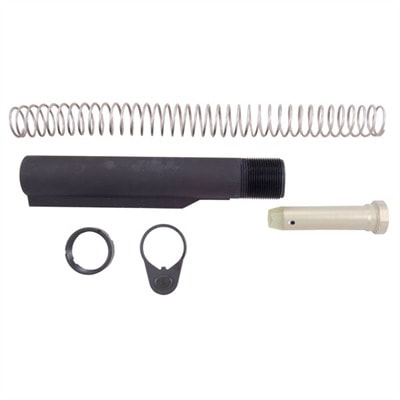
The buffer tube is also differentiated by length. There are two lengths available: 1) rifle length, which accompanies a longer barreled rifle (20+ inches), and 2) carbine length for shorter barreled rifles (10-18 inches). As can be seen in the picture below, the rifle tube is longer than the carbine due to the increased pressure a longer barrel creates, necessitating a longer spring housed in a longer buffer tube to absorb more force.
The last pieces of the buffer assembly are the castle nut and end plate (the two pieces in the top right of the picture above). The end plate holds a detent spring for the safety selector in place, and the castle nut is used to hold the buffer tube and endplate in place and lock it into the lower receiver.
The buffer spring housed within the buffer tube is responsible for pushing the bolt back into the battery after firing. There are two spring lengths: (1) the rifle length spring measuring 12.75” and (2) the carbine measuring 10.5”. Each spring must be matched with the buffer tube of the same name, as mismatching these will cause malfunctions.
After firing, the bolt carrier group of the AR-15 is thrown backward in order to cycle a new round, then pushed forward again by a spring and weighted buffer so that it can (1) lock in the barrel, (2) fire a new round, and (3) repeat the process. That spring and buffer is housed within the buffer tube.
There are two different shaped buffer tubes: based on whether they fit a fixed buttstock (one that doesn't move) or an adjustable (also known as a collapsable) one. The adjustable buttstock's buffer tube will be a cylinder with a rectangular piece jutting out, as can be seen in the picture to the right. The fixed buttstock's buffer tube will just be a cylinder with no rectangular part jutting out.
There are two sizes of buffer tubes as well: mil-spec and commercial. The mil-spec is 2/100ths of an inch smaller than its commercial counter part - and that difference may sound small, but it’s the difference between the butt stock you bought fitting well or becoming a fancy paperweight. [The buttstock slides over the buffer tube and allows you to shoulder the rifle.] Be aware that because the mil-spec tube is smaller, a commercial butt stock will fit on it; however, it will be loose and rattle, and will generally not be a good fit. And, because the mil-spec stock is smaller in diameter, it will not fit a commercial buffer tube. This difference only applies to the butt stock area, as all tubes will have the same diameter on the threaded end, allowing any tube to fit into any lower receiver.
The buffer tube is also differentiated by length. There are two lengths available: 1) rifle length, which accompanies a longer barreled rifle (20+ inches), and 2) carbine length for shorter barreled rifles (10-18 inches). As can be seen in the picture below, the rifle tube is longer than the carbine due to the increased pressure a longer barrel creates, necessitating a longer spring housed in a longer buffer tube to absorb more force.
The last pieces of the buffer assembly are the castle nut and end plate (the two pieces in the top right of the picture above). The end plate holds a detent spring for the safety selector in place, and the castle nut is used to hold the buffer tube and endplate in place and lock it into the lower receiver.
The buffer spring housed within the buffer tube is responsible for pushing the bolt back into the battery after firing. There are two spring lengths: (1) the rifle length spring measuring 12.75” and (2) the carbine measuring 10.5”. Each spring must be matched with the buffer tube of the same name, as mismatching these will cause malfunctions.
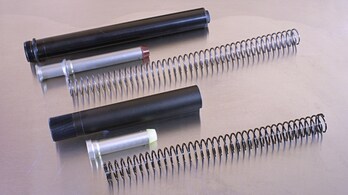 Top: Rifle Length Buffer Assembly; Bottom: Carbine Length Buffer Assembly 4
The actual buffer itself is the part that sits in between the spring and the bolt carrier group. It has different weights as well to help dissipate felt recoil and tune your rifle to shoot the way you want. The heavier the buffer, the less recoil will be felt; however, if it is heavy, it will not properly cycle thus leading to failures. On the other hand, too light of a buffer may cause the bolt to cycle too quickly, leading to double feeds. Rifle length and carbine length buffers are used in their corresponding buffer tubes, and again, are not interchangeable. The standard carbine buffer weighs in at around 3 oz (give or take), based on the manufacturer and is comprised of all steel weights. There are also “heavy” buffers composed of combinations of steel and tungsten: (1) the H1 weighing 3.8oz, (2) H2 weighing 4.7oz, (3) H3 weighing 5.4oz, (4) HSS weighing 6.5oz, and (5) the XH weighing 8.5oz (these weights also vary based on manufacturer).
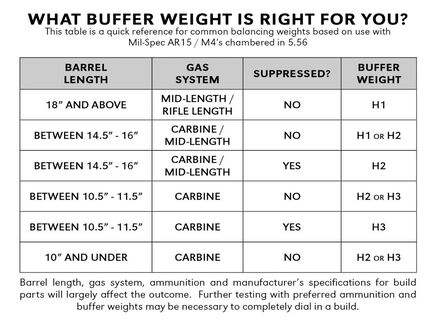 Which Buffer Weight is Right For You? 5
Most often, the standard carbine buffer will suffice for a carbine build, especially if this is your first time. However, the main reasons to step up the weight would be to compensate for an over-gassed build, or to accommodate a caliber higher than 5.56 NATO. One way to tell if an AR is over-gassed is to watch your ejected casings: if they fly out toward the 3 o’clock position, your gas level is healthy. However, if they fly in front of you while shooting and you notice violent extractions, this often indicates an over-gassed rifle, which can lead to excess wear and tear on your rifle as well as added recoil. Check the chart to the left made by Valhalla Tactical Supply for a breakdown.
BROWNELLS - AR-15/M16 BUFFER TUBE ASSEMBLY CARBINE LENGTH
$44.99 |
COLT - AR-15/M16 BUFFER TUBE ASSEMBLY CARBINE LENGTH
$116.99 |
BROWNELLS - AR-15/M16 A2 RIFLE LENGTH BUFFER TUBE ASSEMBLY
$64.99 |
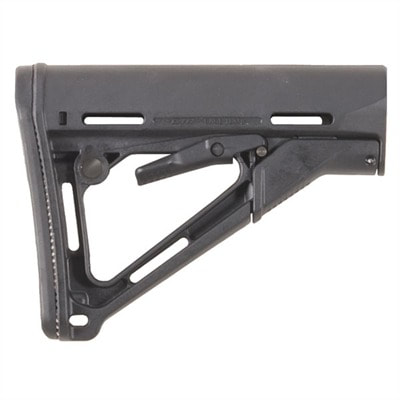
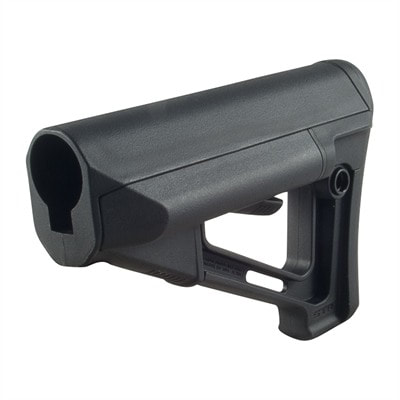
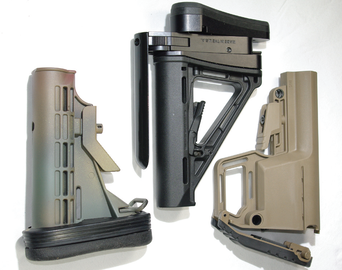 Telescoping Buttstocks 6
Butt stock:
No rifle is complete without a badass butt stock. There are two main types: collapsible and fixed. Fixed stocks are usually seen on bench rifles meant for the shooting range (or the classic original M16 variant rifles), while the collapsible stock is often used on more tactical builds. The collapsing capability allows the stock to quickly change its length to accommodate for extra clothing layers or kit. A fixed stock has less of an adjustment range than the collapsible; however, most are still able to make some adjustments to the height of the cheek weld and shoulder pad. Be sure to follow the use-case of your rifle when deciding which stock to get.
No rifle is complete without a badass butt stock. There are two main types: collapsible and fixed. Fixed stocks are usually seen on bench rifles meant for the shooting range (or the classic original M16 variant rifles), while the collapsible stock is often used on more tactical builds. The collapsing capability allows the stock to quickly change its length to accommodate for extra clothing layers or kit. A fixed stock has less of an adjustment range than the collapsible; however, most are still able to make some adjustments to the height of the cheek weld and shoulder pad. Be sure to follow the use-case of your rifle when deciding which stock to get.
BROWNELLS - CAR-15 BUTTSTOCK MIL-SPEC
$42.99 |
MAGPUL - AR-15 CTR STOCK COLLAPSIBLE MIL-SPEC
$56.99 |
MAGPUL - AR-15 STR STOCK COLLAPSIBLE MIL-SPEC
$76.99 |
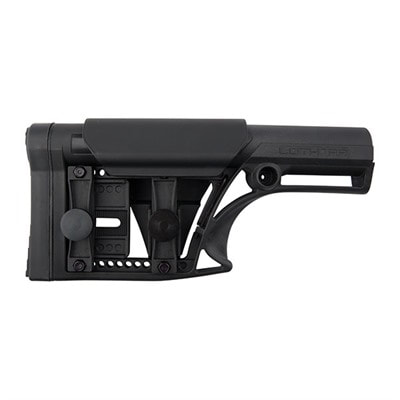
LUTH-AR LLC - AR-15 MODULAR STOCK ASSY FIXED RIFLE LENGTH
$133.99 |
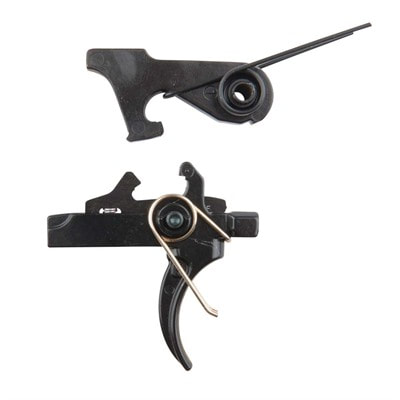
 Trigger Group 7
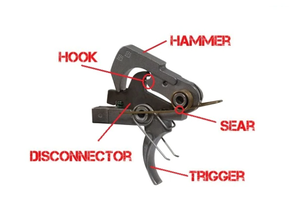
Trigger group:
The most important flesh to metal weld on your rifle is your finger to the trigger. Your grip, finger placement, and trigger pull are all extremely important variables that determine the accuracy of your shot. Slight variances, even in the consistency of how you pull the trigger, can cause your shot to miss - the magnitude of which only increases with distance.
There are two different types of triggers: single-stage and two-stage. The difference has to do with the system the trigger uses to break. A single-stage trigger allows for one pull rearward to fire the weapon. There are different pull weights to consider when using this type of trigger, as some triggers are more sensitive and can require as little as 1.5 lbs to fire. This type would be useful in long range shooting or other shots that require extreme accuracy, as less time on the trigger means less time to make an error. Some triggers have a heavier pull and are often used for high movement and/or stressful scenarios such as a three-gun tournament or other run and gun event where an accidental tap of the trigger may occur and cause the gun to fire.
The two stage trigger has, as the name suggests, two stages. The first is a light “slack” that must be taken up, usually a couple of pounds, before your finger reaches the “wall”. Once you reach the "wall," the trigger acts the same as a single stage trigger - a little extra force and it will fire. These are used in all sorts of applications as the slack allows an accuracy shooter to get a feel for the trigger without accidentally firing it, and it allows a run-and-gunner to not misfire their rifle by accidentally tapping the trigger while running.
Some prefer the single stage while others prefer the two stage, so you can’t go wrong either way. If you have a gun store nearby they will often have display triggers that you can test to see what type feels best to you.
Trigger groups are also available as "drop-in" or broken down. The drop-ins are usually more expensive as they're already put together and are often higher quality triggers overall, while the broken down ones are usually not always found in stock triggers.
No matter what trigger you go with, you will also need a lower parts kit. It includes the other pieces such as the safety selector, magazine release, bolt catch, and other assorted springs and pins needed to finish your lower receiver. They usually come with a stock trigger included, so if you want to save a bit of money, you could always stick with that trigger. The first of these triggers shown below is one that includes a lower parts kit with the trigger.
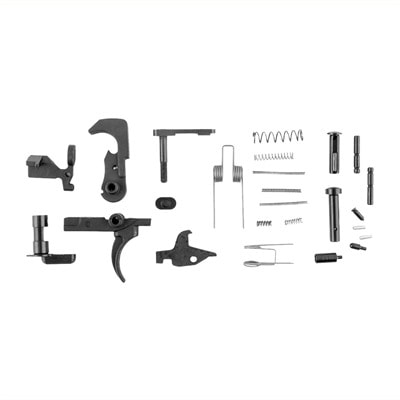
CRITICAL CAPABILITIES LLC - AR-15 LOWER PARTS KIT WITH TRIGGER
$41.99 |
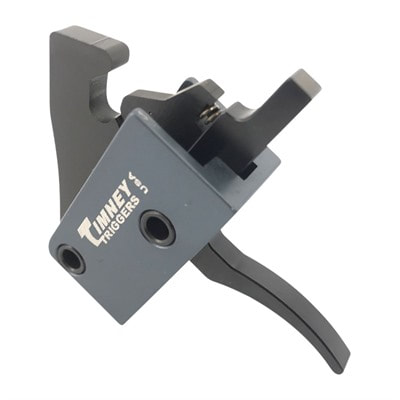
TIMNEY - AR-15 IMPACT TRIGGER
$134.99 |
GEISSELE AUTOMATICS LLC - AR-15 ENHANCED TRIGGERS
$216.99 |
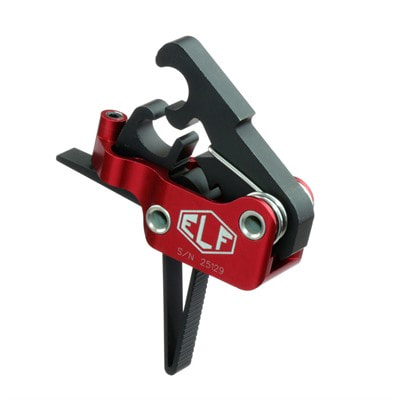
ELFTMANN - AR-15 MATCH TRIGGER STRAIGHT
$249.99 |
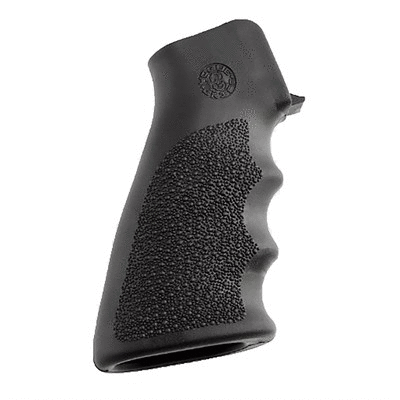
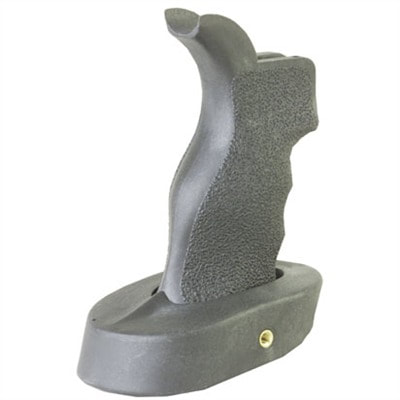
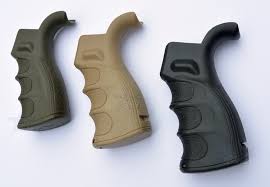 Ergonomic Grips 8
Grips:
There are various types of grips for various applications. While the stock grip that comes in most lower parts kits will suffice, there are some others that are meant for long range shooters, and others that are rubberized and more comfortable. Ultimately, it is a personal preference and is up to you and the use-case of your rifle.
There are various types of grips for various applications. While the stock grip that comes in most lower parts kits will suffice, there are some others that are meant for long range shooters, and others that are rubberized and more comfortable. Ultimately, it is a personal preference and is up to you and the use-case of your rifle.
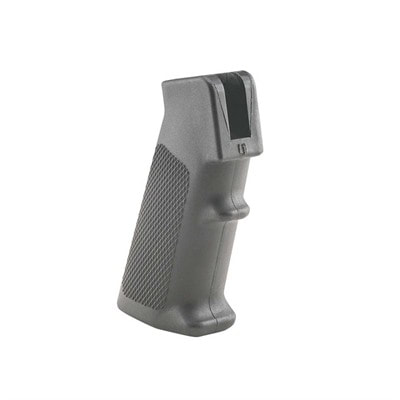
LUTH-AR LLC - AR-15 A2 PISTOL GRIP
$4.99 |
HOGUE - AR-15 PISTOL GRIP
$22.99 |
DPMS - AR-15 PANTHER PALM GRIP
$41.99 |
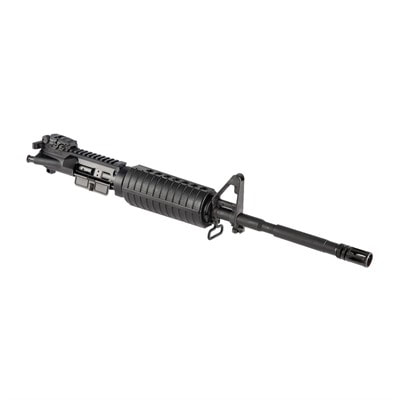
 Upper Receiver 9
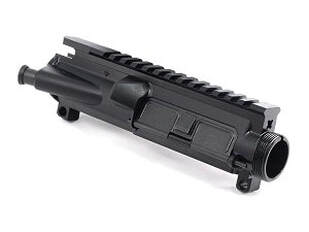
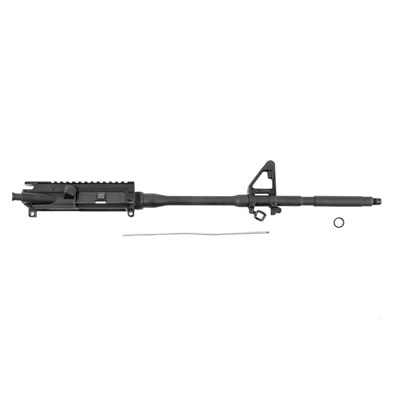
Upper receiver:
The upper receiver is the housing for your bolt carrier group. It is threaded to attach to the barrel and connects it all to the lower receiver. We mentioned earlier, the lower receiver is pretty much the same no matter which one you go with, and the same can be said for the upper receiver. They will all be made of different materials and have their own unique look to try to sell their product, but the most important and easily noticeable difference is the forward assist, or the lack thereof. It is used to ram the bolt closed in case of a bad feed, and though not necessary, it is helpful for three-gunners as it can help clear malfunctions quicker than one without. The upper receiver will also come stripped, meaning: it will come with just the receiver, and you will need to buy a parts kit and attach the dust cover (which keeps dust out of the action when closed) and forward assist button... Or built out, meaning all that extra work will be done for you for a few dollars more. If this is your first time building an AR, we recommend buying the upper receiver already built with the barrel and gas system attached, because unlike the self-assembly of the lower receiver, there are a few extra steps and some extra skill required to put it together.
The upper receiver is the housing for your bolt carrier group. It is threaded to attach to the barrel and connects it all to the lower receiver. We mentioned earlier, the lower receiver is pretty much the same no matter which one you go with, and the same can be said for the upper receiver. They will all be made of different materials and have their own unique look to try to sell their product, but the most important and easily noticeable difference is the forward assist, or the lack thereof. It is used to ram the bolt closed in case of a bad feed, and though not necessary, it is helpful for three-gunners as it can help clear malfunctions quicker than one without. The upper receiver will also come stripped, meaning: it will come with just the receiver, and you will need to buy a parts kit and attach the dust cover (which keeps dust out of the action when closed) and forward assist button... Or built out, meaning all that extra work will be done for you for a few dollars more. If this is your first time building an AR, we recommend buying the upper receiver already built with the barrel and gas system attached, because unlike the self-assembly of the lower receiver, there are a few extra steps and some extra skill required to put it together.

AERO PRECISION - AR-15/M16 STRIPPED UPPER RECEIVER
$64.99 |

AERO PRECISION - AR-15/M16 ASSEMBLED UPPER RECEIVER
$79.99 |
DOUBLE STAR - AR-15/M16 UPPER RECEIVER ASSEMBLY
$267.99 |
COLT - M4 5.56 COMPLETE UPPER RECEIVER GROUPS
$560.99 - $899.99 |
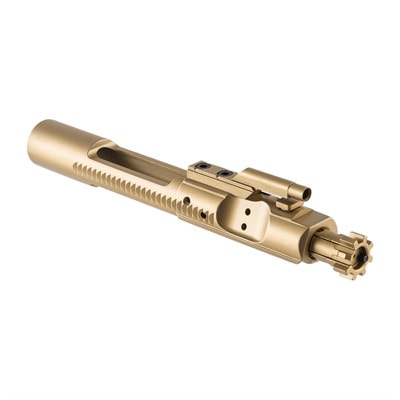
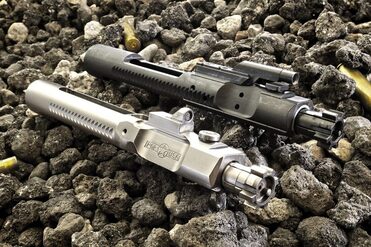 Direct Impingement BCG in Black, Short Strope Piston in Chrome 10
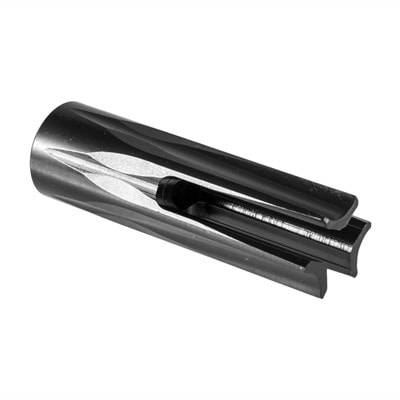
Bolt Carrier Group:
The bolt carrier group, or BCG as it will be referred to from now on, is the component that cycles every time the rifle is fired and feeds a new round into the chamber, automatically.
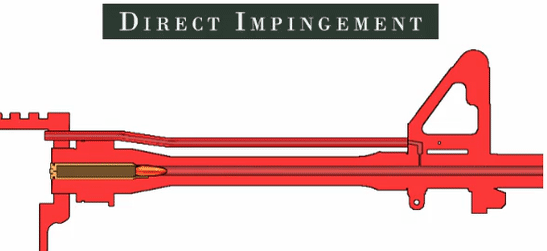
BCG’s are a little more complicated than what we’ve gone over previously - so to start, we will talk about direct impingement vs. piston driven. When a bullet is fired, an explosion of gas pushes the bullet out of the barrel at thousands of feet per second. At a point toward the end of the barrel, a hole is drilled and a gas block is placed on it. The gas block’s job is to siphon some of the pressure back into the bolt carrier group, pushing it back and making it cycle. The original method for accomplishing this was called direct impingement, and it utilized a tube running from the gas block directly to the BCG. The gas would go through the tube and push the BCG to make it move. After some field use, the military noticed the rifles had a tendency to jam after long periods of use, due to the fact that the gas being routed back was full of gunpowder residue that would stick to the BCG and eventually foul it up to the point of error. Note: DI rifles are still issued in the military today, mostly because they’re cheaper, and some basic cleaning will often prevent this type of malfunction. Piston driven BCG’s were later brought to the platform to alleviate this issue. The short-stroke piston sits in-between the BCG and gas block and transfers the force of the gas without spewing the gunpowder residue back into the actual working internals. These run much, much cleaner, but often are a bit less accurate and weigh a bit more than their DI counterparts because of the extra movement and weight induced by the piston. If this is your first rifle build, we recommend going with direct impingement. They are extremely common, and as such, the parts are standardized, and different brands work well with each other. This contrasts with pistons, as often parts from different companies will not work with each other, adding complications to the building process for a beginner. To be safe, stick with direct impingement for your first go.
The bolt carrier group, or BCG as it will be referred to from now on, is the component that cycles every time the rifle is fired and feeds a new round into the chamber, automatically.
BCG’s are a little more complicated than what we’ve gone over previously - so to start, we will talk about direct impingement vs. piston driven. When a bullet is fired, an explosion of gas pushes the bullet out of the barrel at thousands of feet per second. At a point toward the end of the barrel, a hole is drilled and a gas block is placed on it. The gas block’s job is to siphon some of the pressure back into the bolt carrier group, pushing it back and making it cycle. The original method for accomplishing this was called direct impingement, and it utilized a tube running from the gas block directly to the BCG. The gas would go through the tube and push the BCG to make it move. After some field use, the military noticed the rifles had a tendency to jam after long periods of use, due to the fact that the gas being routed back was full of gunpowder residue that would stick to the BCG and eventually foul it up to the point of error. Note: DI rifles are still issued in the military today, mostly because they’re cheaper, and some basic cleaning will often prevent this type of malfunction. Piston driven BCG’s were later brought to the platform to alleviate this issue. The short-stroke piston sits in-between the BCG and gas block and transfers the force of the gas without spewing the gunpowder residue back into the actual working internals. These run much, much cleaner, but often are a bit less accurate and weigh a bit more than their DI counterparts because of the extra movement and weight induced by the piston. If this is your first rifle build, we recommend going with direct impingement. They are extremely common, and as such, the parts are standardized, and different brands work well with each other. This contrasts with pistons, as often parts from different companies will not work with each other, adding complications to the building process for a beginner. To be safe, stick with direct impingement for your first go.
DI vs Short Stroke 11
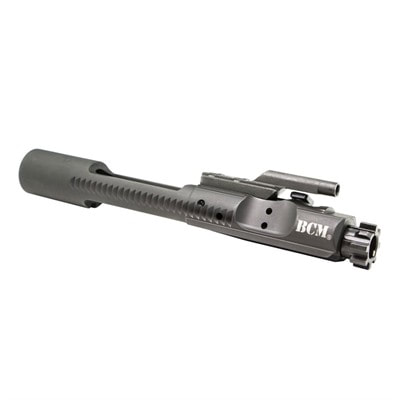
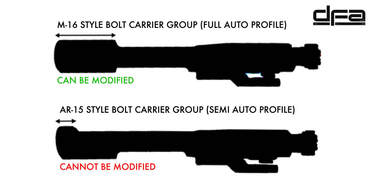 Full vs Semi Auto BCG 12
Something else to note is the difference between a full auto and semi-auto BCG. A full-auto BCG has a bit more meat on the backside, as you can see in the picture, relative to a semi-auto, because when used in a full auto rifle, that extra metal keeps the auto-sear (the part that makes it full auto) down allowing for full-auto capability. Now, the rifle you’re building is going to be a semi-auto as far as we are concerned, and we are by no means condoning building a full-auto without the proper licensing, but we still recommend the full-auto BCG. The extra weight of the full-auto BCG 1) aids in reliability, 2) the original design of the rifle was made with the full-auto BCG in mind meaning it will probably function more reliably, and 3) the full auto capability has no adverse affect on the performance of the rifle in semi auto.
Because the BCG is in direct contact with the bullet casing and the explosion it produces, it is important to make sure it will hold up and accomplish those things without breaking. Two things to verify are that (1) the BCG was high pressure tested and (2) magnetic particle inspected. High pressure testing is what it sounds like: testing the BCG at high pressure, while magnetic particle inspected uses tiny magnetized particles to find incongruences in the metal, if any, are present.
Don’t cheap out on the BCG and barrel. It may be tempting to go with the cheaper option than what you were originally planning to get, but trust us, it’s not worth it. Get what you can afford, but if you’re going to skimp on an area of the rifle, do it somewhere other than the BCG and barrel.
Pro Tip: There are different coatings applied to the BCG’s to make them silver, gold, red, black, shiny, or matte. In our experience, we’ve found that the shiny bolts are often slicker, and therefore easier to clean (a big plus for DI rifles).
An integral part that we're going to talk about here, because we don't know where else to put it, is the charging handle. It is responsible for the manual manipulation of the BCG, namely during reloading a new magazine or clearing malfunctions. We recommend the Radian Raptor, though there are other manufacturers available, and some BCG's will come with their own charging handle included.
BROWNELLS - M16 5.56 BOLT CARRIER GROUP TiN
$123.99 |
BRAVO COMPANY - M16 5.56 BOLT CARRIER GROUP
$189.99 |
J P ENTERPRISES - AR-15 5.56 FULL MASS BOLT CARRIER GROUP
$99.00 |
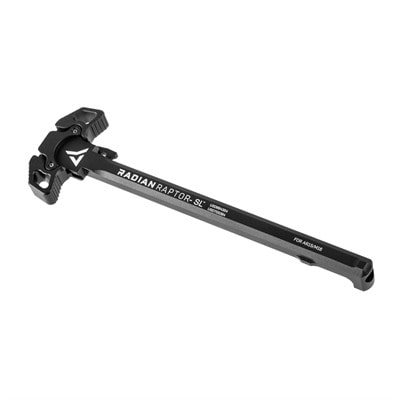
RADIAN WEAPONS - AR-15 RAPTOR-SL CHARGING HANDLE 5.56
$87.99 |
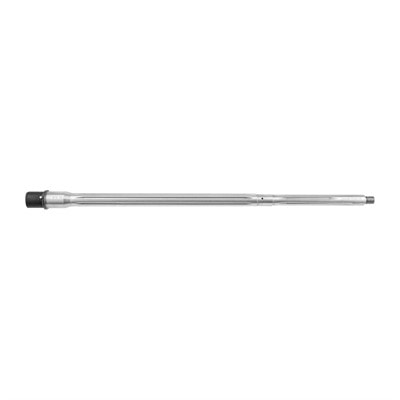
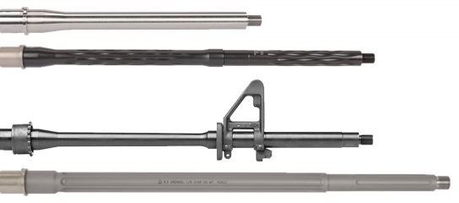 Different Types of Barrels in Varying Lengths 13
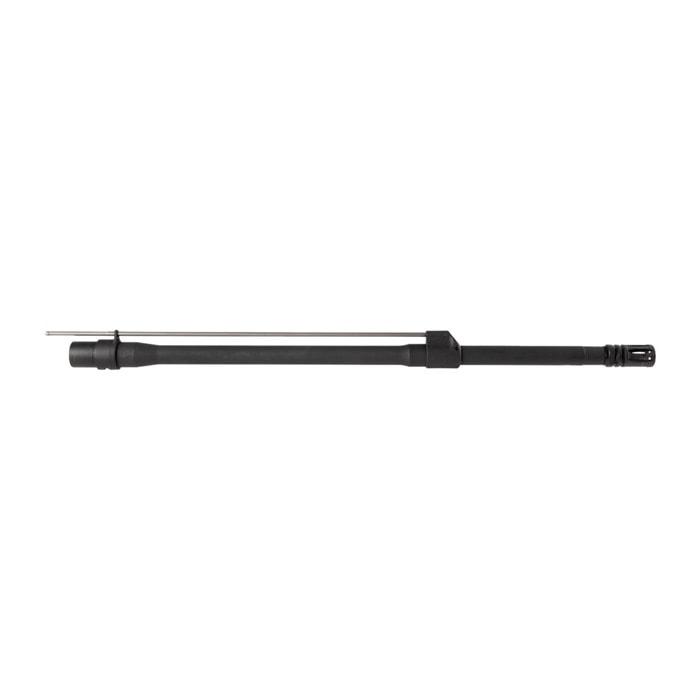
Barrel:
Barrels come in different shapes and sizes, so be sure to keep the rifle's use-case in mind as you make the decision on what you want.
The minimum legal length of a rifle barrel in the United States is 16 inches. Anything less requires a Short Barrel Rifle license (unless you are building an AR pistol, which is a different animal that we will discuss in a future article). Building off of that, increasing the barrel length will increase the accuracy and velocity at the expense of weight. The average "long" AR barrel typically tops out at 20 inches, though there are 24 inch barrels in production.
Match grade and combat grade barrels are pertinent to the use-case of your weapon. Match barrels (as well as match ammo) are designed to be more accurate, at the cost of a shorter barrel lifespan. Combat barrels, on the other hand, are designed for hard use, while sacrificing a bit of accuracy. Chrome lining is an optional addition to the inside of your barrel to further increase lifespan, corrosion resistance, and make it easier to clean, while slightly decreasing long range accuracy. For the most hard knock lead-spitter, a chrome lined combat barrel is hard to beat - though for long range shooting, you may want to stick to a match grade without chrome.
When fired rapidly or for long periods of time, the barrel of the rifle will get extremely hot. Hot barrels are bad as they temporarily cause the metal to slightly warp, leading to less accuracy, and potential burns if you're not careful. Barrels can be fluted and non-fluted. In the picture above, the barrel second from the top and the barrel on the bottom are fluted, while the other two are not. Fluting the barrel cuts some weight and increases the overall surface area of the barrel, allowing it to cool faster than one that is not fluted.
In the old days, a musket could fire a musket ball and maybe hit their target at 100 yards, if the shooter was lucky. Eventually, it was found that by adding spiraling groves inside of the barrel, the musket ball would spin and its accuracy would be significantly increased. This technique was called rifling, and in turn, gave the name to the modern rifles we know today. Rifling is measured by how many inches the bullet must travel to complete a revolution (known as the twist rate). The most common are 1:9, 1:8, 1:7, meaning 1 twist per 9 inches, etc. The higher twist rate is better suited for heavier and longer bullets (e.g., 1:7 is better than 1:9), while the lower and shorter twist rates favor lighter bullets.
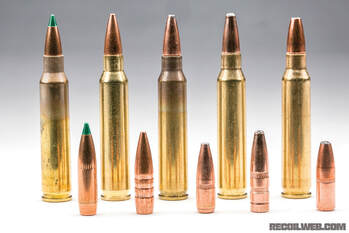
A couple of facts before we continue to aid in your understanding: 1) The most common standard target practice ammo weighs in at 55 grains or .12 oz, and 2) the effective range of an AR-15 is 400-600 meters.
 Different Sizes and Weights 14
Bullets come in all shapes and sizes, even the ones in the same caliber. Heavier bullets such as a 77 grain are more accurate at range than their 40 grain cousins, because their weight gives them added momentum and makes it harder for the wind to blow them off target. As such they are often used in longer barrel rifles with higher twist rates to squeeze as much accuracy out of the rifle as possible. Shorter combat rifles will generally stick to a higher twist rate and lower grain ammo, as ballistics are not as important when you're gunning for a target less than 100 yards away. The twist rate of your rifle ultimately depends on what ammo and at what distance you are planning on shooting. If you want a “jack-of-all-trades” build, we have seen evidence from Pew Pew Tactical that 1:7 is among the most effective, as it allows for better accuracy with heavier bullets, and also very acceptable accuracy with lighter ones.
IMPORTANT: There are two types of ammo an AR-15 rifle can fire: 5.56x45 NATO and .223 Remington. The 5.56 is the standard issue military round while the .223 is the civilian equivalent. While they may be the same size, the pressure is much higher coming out of the 5.56 relative to the its civilian counterpart. Therefore, while it is possible to shoot a .223 out of a 5.56 barrel, DO NOT shoot a 5.56 out of a .223 as it can lead to catastrophic failure. To err on the safe side, opt for a 5.56 NATO barrel and save yourself the headache, and maybe even your head.
FOXTROT MIKE PRODUCTS - AR-15 5.56 BARREL PREMIUM ULTRALIGHT
$135.99 |
DANIEL DEFENSE - AR-15/M16 5.56 HAMMER FORGED BARRELS
$275.99 |
CRITERION BARRELS INC - AR-15 BARRELS, FLUTED, STAINLESS STEEL, RIFLE-LENGTH
$339.99 |
LEWIS MACHINE & TOOL - AR-15 MRP BARREL 5.56
$422.99 |
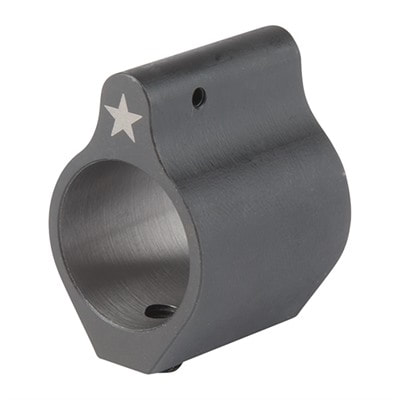
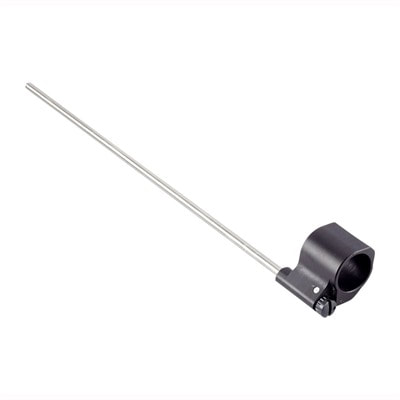
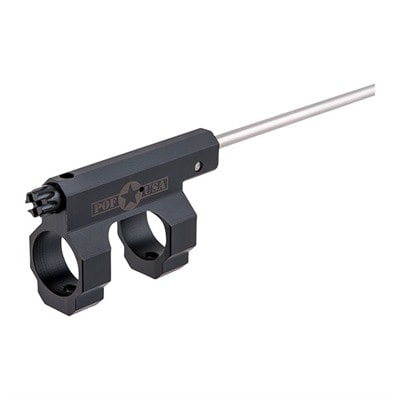
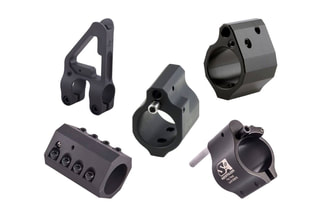 Different Types of Gas Blocks 15
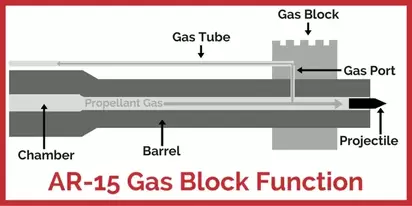
Gas Block:
The gas block is the valve that dictates how much gas is fed from the barrel through its gas port hole to cycle the bolt. There are two ways to make this happen: 1) direct impingement (DI), or 2) the piston system. The original method for accomplishing this was called direct impingement, and utilized a tube running from the gas block directly to the bolt carrier. The gas goes through the tube and directly impinge the bolt carrier to make it move. The short-stroke piston is an alternate method and sits in between the bolt carrier and gas block, and transfers the force from the block to the carrier. [See the gifs back in the "Bolt Carrier" section for a visual on how they differ].
The gas block is the valve that dictates how much gas is fed from the barrel through its gas port hole to cycle the bolt. There are two ways to make this happen: 1) direct impingement (DI), or 2) the piston system. The original method for accomplishing this was called direct impingement, and utilized a tube running from the gas block directly to the bolt carrier. The gas goes through the tube and directly impinge the bolt carrier to make it move. The short-stroke piston is an alternate method and sits in between the bolt carrier and gas block, and transfers the force from the block to the carrier. [See the gifs back in the "Bolt Carrier" section for a visual on how they differ].
 "Dwell Time" Diagram 16
There are different lengths for the gas system based on the length of your barrel. Typically, you want the length of the gas system to increase alongside an increase in barrel length. This is due to what is known as “dwell time” or how long the bullet stays in the barrel after the gas has reached the block. The gas inside the barrel is only pressurized as long as the bullet is inside. Once the bullet leaves, the pressure leaves like a cork coming off a champagne bottle. It is important that the placement of the hole is not too close to the beginning of the barrel, as too much gas will cause too much recoil and excessive wear over time. On the other hand, being too close to the end of the barrel will not leave enough gas, leading to short stroking or other malfunctions. There are three main lengths we will focus on: carbine, mid, and rifle. The carbine length is for 10-18 inch barrels, the mid is for 14-20 inch, and lastly the rifle is for 20+ inch barrels. For typical carbine builds, try to go for a mid length gas system as it will provide less felt recoil.
Adjustable gas blocks allow for the shooter to adjust the amount of gas being vented back into the bolt carrier. These are helpful when fine-tuning your rifle, as adjusting the gas can reduce overall felt recoil, and fix some malfunction issues. They also allow shooters to tune a rifle based on the ammo they are shooting, as some rounds have less gunpowder than others, and an opening of the gas port may allow the bolt to cycle more consistently.
Adjustable gas blocks allow for the shooter to adjust the amount of gas being vented back into the bolt carrier. These are helpful when fine-tuning your rifle, as adjusting the gas can reduce overall felt recoil, and fix some malfunction issues. They also allow shooters to tune a rifle based on the ammo they are shooting, as some rounds have less gunpowder than others, and an opening of the gas port may allow the bolt to cycle more consistently.
BRAVO COMPANY - AR-15/M16 LOW PROFILE GAS BLOCKS
$45.99 |
WILSON COMBAT - AR-15 LO-PROFILE BULLET PROOF ADJUSTABLE GAS BLOCKS WITH GAS TUBE
$119.95 |
PATRIOT ORDNANCE FACTORY - AR-15/M16 DICTATOR ADJUSTABLE GAS BLOCKS
$142.99 |
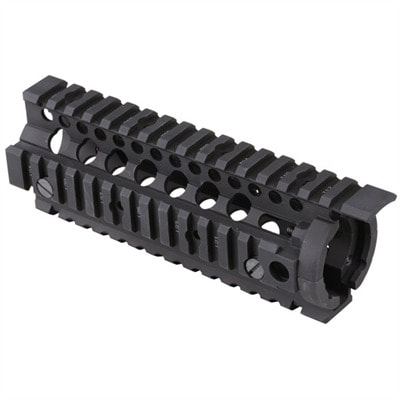
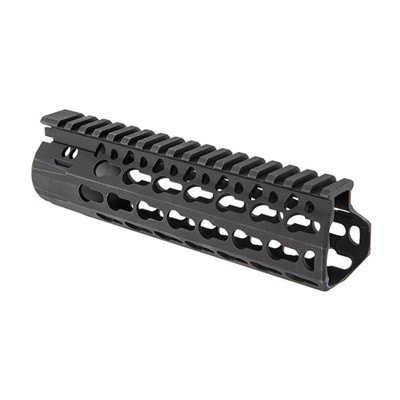
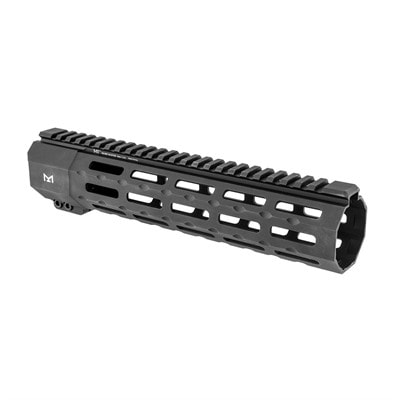
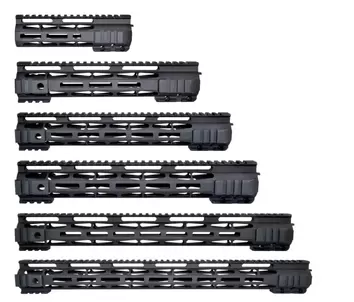 Different Length Handguards 17
Handguard:
The aptly named handguard guards your hands from touching the barrel when gripping the front end of the rifle. There are various different lengths and attachment systems available, all of which are apt to preference and how you want the rifle to look and feel at the end of the build. Some of the attachment systems include picatinny, KeyMod, and M-LOK. Picatinny is the common rail system used by a majority of the accessories you will encounter, however, it is a bit rough on the hands and is a bit wider when gripping it. KeyMod and M LOK are smooth faced handguards with specialized holes cut throughout, to allow the attachment of accessories or strategically placed strips of picatinny rail, to maintain the accessorize-ability of the handguard.
Pro Tip: When selecting a handguard, be sure it is free float, meaning it is attached directly to the upper receiver and does not come into contact with the barrel. This allows the shooter to avoid applying any pressure to the barrel when shooting, as it can move the barrel and affect the accuracy of the shot.
DANIEL DEFENSE - AR-15 OMEGA RAIL QUAD RAIL - PICATINNY
$193.99 |
BRAVO COMPANY - AR-15 BCMGUNFIGHTER™ KMR ALPHA FREE FLOAT HANDGUARDS - KEYMOD
$171.99 |
MIDWEST INDUSTRIES, INC. - SP SERIES HANDGUARDS - M-LOK
$139.99 |
 Various Muzzle Devices 18
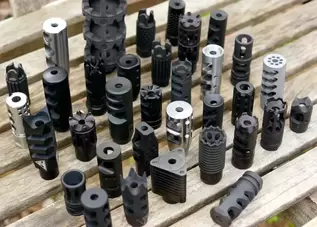
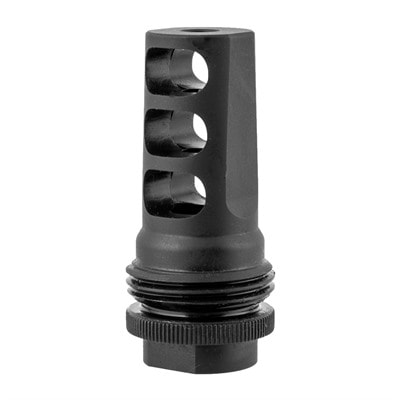
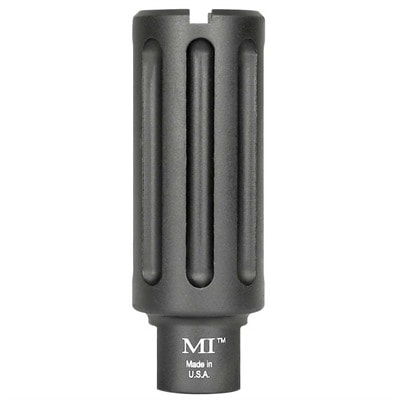
Muzzle:
The final piece of the AR build is the muzzle device attached to the front end of the barrel. While it is not required, it will help increase your recoil control, accuracy, and/or muzzle flash. There are three main types to be aware of: muzzle brake, compensator, and flash hinders - each with their own benefits. The muzzle brake is used to vent gasses off to the sides of the barrel, reducing recoil at the expense of increased noise and a healthy dose of vented gas for those to your sides. The compensator is used to reduce muzzle climb by venting the gas upwards thus pushing the muzzle down. Flash hiders are used to dampen the fireball thrown from the front of the weapon, making the shooter more effective when using night vision and less visible overall when shooting. Flash hiders are illegal in some states (such as California) so be sure to check your local laws first.
The final piece of the AR build is the muzzle device attached to the front end of the barrel. While it is not required, it will help increase your recoil control, accuracy, and/or muzzle flash. There are three main types to be aware of: muzzle brake, compensator, and flash hinders - each with their own benefits. The muzzle brake is used to vent gasses off to the sides of the barrel, reducing recoil at the expense of increased noise and a healthy dose of vented gas for those to your sides. The compensator is used to reduce muzzle climb by venting the gas upwards thus pushing the muzzle down. Flash hiders are used to dampen the fireball thrown from the front of the weapon, making the shooter more effective when using night vision and less visible overall when shooting. Flash hiders are illegal in some states (such as California) so be sure to check your local laws first.
SILENCERCO - AR-15 ASR MUZZLE BRAKE 5.56 CALIBER
$90.99 |
MIDWEST INDUSTRIES, INC. - AR-15 BLAST CAN COMPENSATOR 5.56 CALIBER
$29.99 |
FAXON FIREARMS - AR-15 STREAMLINE FLASH HIDER
$59.99 |
Where we got the pictures:
1. https://www.womensoutdoornews.com/2017/07/ar-15-breakdown/
2. https://www.primararms.com/anderson-manufacturing-ar-15-stripped-lower-receiver
3. https://www.brownells.com/rifle-parts/receiver-parts/buffer-tube-parts/buffer-tubes/ar-15-carbine-buffer-kits-prod130139.aspx
4. https://blog.cheaperthandirt.com/category/general/page/13/
5. https://geissele.com/super-42-braided-wire-buffer-spring-and-buffer-combo.html
6. http://www.thegunmag.com/accessorizing-a-versatile-msr-customizes-it-to-fit-your-needs/3-different-ar15-buttstocks/
7. https://www.ar-15lowerreceivers.com/blogs/80-lower-news/ar-15-triggers-the-full-guide-troubleshooting/
8. https://rouschsports.com/shop/ar15-lower-parts/ar15-pistol-grips-grips/ar15-pistol-grip-black-fde-od-green/
9. https://www.riflegear.com/p-4899-bcm-m4-upper-receiver-assembly-w-laser-t-markings.aspx
10. https://ontargetmagazine.com/2018/04/pof-revolution/
11. https://gfycat.com/mindlessfaintladybug
12. https://deadfootarms.com/bolt-carrier-mod-2/
13. https://ar15discounts.com/collections/barrels/
14. https://www.recoilweb.com/sbr-ammo-buyers-guide-141394.html
15. https://www.wingtactical.com/best-rated-ar-15-gas-blocks/
16. https://thesurvivallife.com/best-ar-15-gas-block.html
17. https://ar15discounts.com/products/presma-ar-15-m-lok-handguard/
18. https://thesurvivallife.com/best-ar-15-muzzle-devices.html